A Guide To Benefits of Door Visor, Rain Guard Installation, And Removal

Are you exposed to raindrops, sun reflection, wind gust or even snowfall while in your car or while driving? Worry no more, because in a world of advanced technology, there is a solution for virtually everything.
Car door visors also known as Rain guard visors are specially built automobiles parts that keep vehicles protected from external elements like rain, snow, or wind, yet allowing the free passage of air from a lowered window while driving.
If I’ve got you thinking of purchasing a set of door visors for your vehicle, or make you want to ask questions on Door visor installation, then read on, this is specially for you. Although the installation and removal process of visors may vary between the types of visors, they most often follow the same basic steps. This quick guide can brief you on how to fix or remove door visors in cars.
What Is A Door Visor?
A Door Visor is an exterior automobile extension for vehicles, ranging from Jeeps, sedans, pickup trucks, SUVs etc. that is commonly appended to the uppermost part of a vehicle’s door frame. These visors give additional covering to your vehicle from outdoor weather like wind, rain and snow, while offering the desired air flow and circulation from a lowered window. They also serve as security for vehicles from theft cases arising from vehicle break-ins, in situations where a window is left slightly lowered, since it covers the top of the door frame.

A door visor also known as a rain guard or window deflector, is mainly designed to deflect rain, snow, and reduce wind noise while driving with a lowered window.
Benefits of Door Visor
▶" title="Step-by-Step Guide For Door Visor Installation | Car Accessories | Carxtreme" width="100%">
There are many benefits of door visor. They are produced to give you ultimate protection from outdoor weather and are custom designed to fit in for your vehicle’s specific make, model, and generation.
The rain guard deflectors are thoroughly built to withstand exposure to alternating weather conditions, which includes rain, wind, sun, or snow. These door visors have a strong acrylic frame which makes it hard to fade or break down over time, notwithstanding, it effectively reduces wind sound emanating from a lowered window.
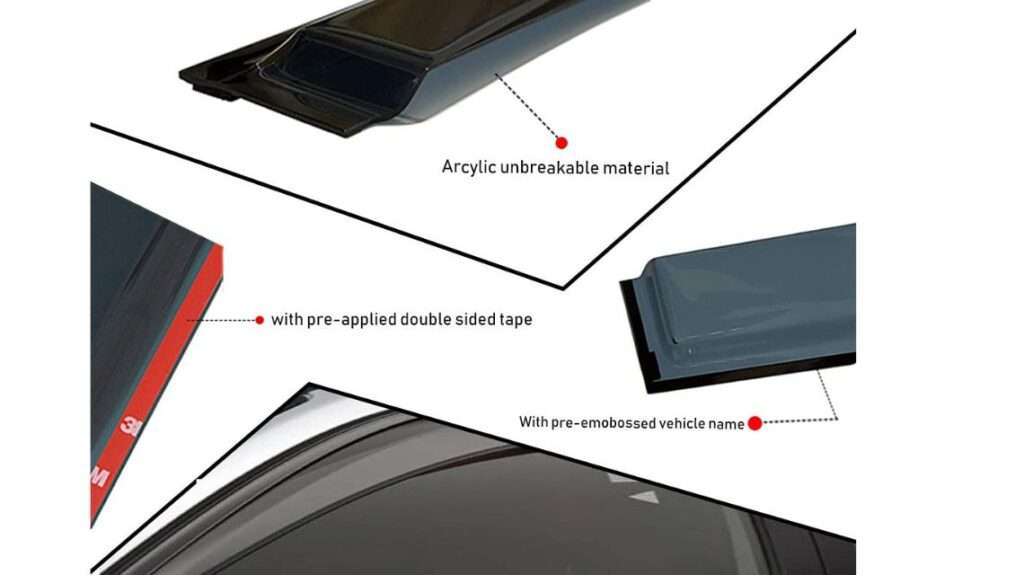
Also, exterior stick-on window visors have no direct contact with the window glass, which makes for a smooth installation and removal process. Some visors come along with 3M automotive tape that averts damaging the paint on a vehicle’s door frame.
Door Visor Installation Guide
Installing a set of exterior stick-on door visors is a simple do-it-yourself task which can be done in less than 30 minutes.
Wherever you might be completing the installation, be it in a garage or on your driveway, the best temperature for installation is between 21-40 degrees Celsius (68-110 degrees Fahrenheit) with low humidity. If it’s too hot, cold, or humid, the visor adhesive will not stick well.

To get started, lay all the door visor installation components on a table. Required Tools for Rain Guard Installation:
- Water and a little soap
- Towels or microfiber cloth
- A surface cleansing napkin (often provided in package)
Clean The Door Frames
Ensure to clean the area on the vehicle door where you’ll be installing the visor and dry before installing any components. Then wipe down the area with some basic soap and water, removing all soap remnant and ensuring the area is absolutely dry.
Remove The 3M Adhesive Tape
Follow our step-by-step guide to safely remove 3M adhesive tape for a hassle-free door visor installation.
Install Rear Visor
Start with the front end of the back door and slowly pull off the protective backing while pressing the visor against the door frame.
Ensure that the rear visor is placed in alignment with the top of the door frame.
Install Front Visor
Start from the back of the driver’s door, and slowly pull off the protective backing while pressing the visor against the door frame.
Also ensure that the front visor is placed in alignment with the top of the door frame.
Press Firmly along Visor
Ensure to press thoroughly along both the rear and front visor.
Repeat Steps 3-5 on Passenger Side
After completing both sides, your vehicle is ready to hit the ground running. Do well to enjoy your ride with the desired air flow from a lowered window irrespective of the weather conditions.
How To Remove Car Door Visors?
There are reasons that make you want to install a door visor, but if for another reason you ever need to remove the rain guard visors from your vehicle, the process is simple and can be completed at home. A good quality door visor uses 3M tape which wouldn’t cause damage to the paint on your vehicle’s door frame. However, it’s advised that you slowly remove any fragment with adhesive in order to have a neat surface leaving no glue or gum residue.
Required Tools for Door Visor Removal:
- Screwdriver with T45 Torx and phillips head
- A surface dryer
- Microfiber cloth or towel
- Water and some soap
Heat the Visor
Slowly move the heating device or fast blow the dryer back and forth over the visor. This softens the adhesive backing and makes it easier to dismount the visor.
Slowly Remove the Visor
Gently pull the heated visor, starting from one end. If it’s still strongly attached, heat the visor again and again. Once loose, pull back to ensure the visor is totally dismounted from the vehicle. Repeat the same process for the next visor and repeat the same for the passenger side visor.
Slowly Remove 3M Automotive Tape
Slowly remove the remaining 3M automotive tape that is still stuck to the vehicle’s door frame.
Wipe Down Door Frame
There might still be some small fragments and particles of adhesive stuck to the door frame. Wipe down the door frame with a moist microfiber cloth or towel that won’t scratch the vehicle’s paint and If needed, apply some basic soap that won’t wash off the paint and wipe dry.
Conclusion For Car Door Visor Benefits
At the end, I hope this bit by bit guide would be helpful to get your vehicle readily prepared to move with properly installed rain guard door visors.
To explore further on how to remove wind deflector at home, do well to check the manual in the visor package you’ve purchased, you can as well further your research to expand your horizons with regards to Door visor installation.
![]() Carxtreme offers top-notch car accessories and help to to enhance your car look
Carxtreme offers top-notch car accessories and help to to enhance your car look
Copyright 2024 © Carxtreme Theme. All right reserved.